Bipeditor Manual
The Bipeditor allows you to create VR scenes made of boxes to climb around in in Biped Blocks. It has tools to place boxes of different sizes, colors, and orientations, and lets you jump in and play test.

The Bipeditor is included in the download for Biped Blocks in the downloads page, start it by running the file bipeditor.bat that is included in the zip file. But before you do that, you might at least want to read the overview below!
The Bipeditor interface has been developed based on the HTC Vive's controllers. It should work with any SteamVR compatible headset with tracked controllers, and has been confirmed to work with Oculus Rift as well (the controls will not be as straightforward though).

The Bipeditor is built around a number of tools: The Move Tool, the Color Tool, the Move World Tool, and Play Mode.

The Bipeditor is included in the download for Biped Blocks in the downloads page, start it by running the file bipeditor.bat that is included in the zip file. But before you do that, you might at least want to read the overview below!
The Bipeditor interface has been developed based on the HTC Vive's controllers. It should work with any SteamVR compatible headset with tracked controllers, and has been confirmed to work with Oculus Rift as well (the controls will not be as straightforward though).
Overview
Editing is done in VR using the Vive controllers. The same tools are available on both controllers, which can be used more or less independently. Resizing boxes requires to use both controllers at the same time, though.
The Bipeditor is built around a number of tools: The Move Tool, the Color Tool, the Move World Tool, and Play Mode.
- The current tool for each controller is indicated by an icon on the circle pad.
- The Move and Color tools care about the current color. When they are selected, it's displayed on a hexagon above the circle pad.
- Each contoller has a pointer, which is the tip of the wireframe pyramid on top of it. To choose which object to grab, change color on, etc., point to it by pointing the tip inside the object.
- Help text is displayed by default to explain what the controller buttons and menu options do. It can be disabled in the options menu.
By default, scenes are saved and loaded from a file called scene.biped. If you drag and drop another scene file onto bipeditor.bat (or specify the file name as a command line argument to it) that file will be used for saving and loading instead. There is no way to change the scene file name while inside the editor, so make sure that you don't overwrite a file that you don't want to! Make a copy of the file first.
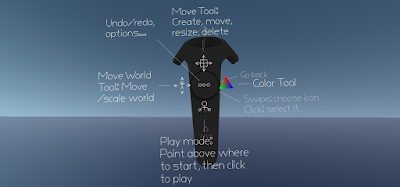 The menu button (above the circle pad) brings up the main menu, where you can change the current tool and access options.
 The Move Tool is used to create, move, resize, and delete objects. New boxes are created with the current color (set using the Color Tool) and the controller's current box size, which is set when the controller is used to resize a box. The box size can also be picked up from an existing box.
Create: Press trigger to create a box with the current color and the controller's current box size.
The color tool is used to choose colors, apply them to and pick them up from objects.
 Choose color: Touch the circle pad to bring up the color picker:

By default, the world is edited in a scale of 1:8 compared to play mode. The editing scale can be changed with the Move World Tool.


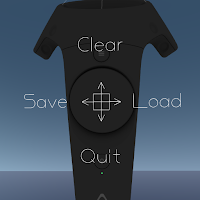 The file menu allows you to save, load, or clear the current scene, and quit. To quit, select the quit option and then press trigger. This will also save the current scene to the file autosave.biped.
By default, scenes are saved and loaded from a file called scene.biped. If you drag and drop another scene file onto bipeditor.bat (or specify the file name as a command line argument to it) that file will be used for saving and loading instead. There is no way to change the scene file name while inside the editor, so make sure that you don't overwrite a file that you don't want to! Make a copy of the file first.
There are keyboard shortcuts that can be used for the file menu commands when the Bipeditor window has focus:
The main menu
 The menu button (above the circle pad) brings up the main menu, where you can change the current tool and access options.
All menus are navigated by swiping on the circle pad to choose an icon. When the icon pops, click the circle pad to choose it. You can also back out of a menu with the trigger or the menu button.
The Move Tool

Move: If you are pointing into an object, pressing trigger will grab it instead, so that you can drag it to a new position and orientation. When you create a new object, it is grabbed initially.
Resize: When dragging an object, hold the trigger on the other controller and move it to resize the object. This works regardless of which tool the other controller has. Resizing is most intuitive if you grab with the second controller when the pointer is close to one of the box's corners.
Delete: Press one of the grip buttons to delete the object you are pointing to or holding.
Pick up box size: Touch the circle pad while pointing into a box to pick up its size. This size will be used when creating new boxes with the controller.
The Color Tool

- Move the pointer over the color triangle to change hue/saturation.
- Swipe up/down on the circle pad to change intensity.
- Press the circle pad to accept the new color.
- Release the circle pad to cancel and keep the old color.
Set color: Point into an object and press trigger.
Pick up color: Point into an object and touch the cirle pad.
If you keep holding the trigger after you have set the color of an object, and bring up the color picker, your choice of color will be reflected on the object (as well as the controller).
If you keep holding the trigger after you have set the color of an object, and bring up the color picker, your choice of color will be reflected on the object (as well as the controller).
Play Mode

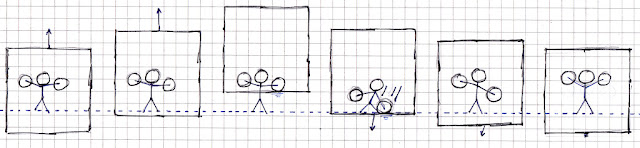
Play mode lets you drop into Biped Blocks and play test your scene. You won't restart automatically if you fall down, but you can just exit and reenter play mode instead.
Enter play mode: Go into the main menu and point above where you want to start. As soon as you click the play mode icon, you will drop into play mode.
Exit play mode: Press the menu button.
The Move World Tool
The Move World Tool is used to move yourself in relation to the world, and to change the scale that the world appears when editing. This will not change the scale of the world in play mode.

Move the world: Press trigger to grab the world and drag it around.
Resize the world: Press the circle pad and slide up/down to change the scale of the world.
The Options Menu
The icon at the center of the main menu brings up the options menu. Here you can choose undo/redo, toggle help text, and access the file menu.

The File Menu
 The file menu allows you to save, load, or clear the current scene, and quit. To quit, select the quit option and then press trigger. This will also save the current scene to the file autosave.biped.
By default, scenes are saved and loaded from a file called scene.biped. If you drag and drop another scene file onto bipeditor.bat (or specify the file name as a command line argument to it) that file will be used for saving and loading instead. There is no way to change the scene file name while inside the editor, so make sure that you don't overwrite a file that you don't want to! Make a copy of the file first.
There are keyboard shortcuts that can be used for the file menu commands when the Bipeditor window has focus:
Save: ctrl-S (Also works in play mode, handy when you want to make sure your kid's work is saved!)
Load: ctrl-L
Clear: ctrl-C
Quit: ctrl-Q / alt-F4 (quits directly)
Quit: ctrl-Q / alt-F4 (quits directly)
Loading a scene into Biped Blocks
- Saved scenes contain a starting position that is used when loading the file into Biped Blocks. The starting position will be the last position that was used to enter play mode before saving.
- To load a saved scene in Biped Blocks, just drag and drop a scene file onto biped-blocks.exe (or specify the file name as a command line argument to it).


Comments
Post a Comment